Optimizing Cost in Opus Magnum
Welcome back, old and new fans of Opus Magnum. It’s now March 2024, and the annual Opus Magnum tournament is still ongoing. Looking at the scores, kaliuresis seems to be the strong favorite this year. But we have just entered a break week, and with the most recent puzzle fresh on my mind, I felt inspired. Today, I am going to write about the history and techniques of cost optimization.
The previous post on this blog, about Refined Bronze and the cow bet, did talk about cost a little bit. PentaPig triumphed over the puzzle in 2019. It was a much simpler time. But you don’t need to have read that post. To start, we are going to go back even further. We are first going to look at the game from the perspective of a brand new player.
Parts of a solution

When solving a puzzle in Opus Magnum, you are free to place the various “mechanisms” and “glyphs” enabled for the puzzle, as much or as little as you like. Each one has a price tag beneath it. There is no budget, but when you solve a puzzle, one of your scores is the cumulative sum of the price of every part in your machine.

As an example, this solution to airship fuel has “Cost: 80g” displayed at the bottom. The cost comes from two bonders for 10g each, a calcifier for 10g, an arm with a single gripper for 20g, and the arm with six grippers (a hex arm) for 30g, totaling 80g. The inputs and outputs are free, as are the 5 “glyphs of equilibrium” which serve as decoration. Your cost doesn’t care about how your machine runs, simply what it is made from.
I feel this is important to say right away: the game is not trying to restrict your freedom or creativity. You can spend as much or as little as you like with no penalty. Any decision to limit yourself in approach, is your own. With that said, these price tags suggest one avenue for optimization. For many players, it’s an appealing suggestion. How low can you make the in-universe cost of your machine?
Cheaper, not Cheapest
Many players approach the puzzles by taking their first idea and attempting to implement it. They get attached to that idea, and are hesitant to redesign from the beginning. So for these players, cost optimization might look like taking an existing solution and figuring out some drop-in replacements.
For example, here’s a one-arm solution to Hair Product, costing 60g for a piston (40g), two track (5g each) and a bonder (10g):

But pistons are very expensive! You could use a regular arm almost identically by having it sit on 3 tracks instead of 2:

Using rotations instead of translations where possible, you can remove one of the tracks too:

While retaining the same general process, you can try to find a cost-effective implementation. But the true cost optimizer thinks about things differently.
Cheapest or Bust
Instead of viewing cost as an optimization process, we can instead regard it as a constraint. You have to solve the puzzle using only the bare minimum. Figure out what that is first, and then come up with a process. It is slightly more abstract though, to try to reason through what you need, without thinking yet of how you would use it. I feel like for this to make sense, I should first talk generally about the concept of “solution space”.
Solution Space
For those with a strong mathematics background, a “space” of abstract objects like Opus Magnum solutions, is maybe not a challenging concept. But for anyone else, I don’t want to lose you, so here’s my attempt to explain it.
Imagine you had the ability to look at every possible machine that solves a given puzzle. It doesn’t matter whether someone has ever built the solution – philosophically this space is already there, looking to be discovered rather than invented. What’s more, imagine the collection is organized, so that given any additional condition such as a target cost, you could freely filter down to see only the solutions satisfying that condition.
If you went to a high-enough-dimensional coordinate system, you could probably find a mapping between points in that system and solutions in solution space. But we aren’t using equations, so we don’t need to know anything about coordinates for the concept to still be useful. Solution space, as a discoverable entity shaped by the design of the puzzle itself, exists on its own.
Solution space contains all of the answers about the limits of optimization. If you asked for a solution with a certain cost, and found none, that would suffice to prove that that cost was actually impossible.
We can’t actually see solution space in its entirety. We can see the solutions we have built, and if we have good imaginations, the ones we imagined too. But I bring the concept up because I think this way, and I write this blog. Sometimes this influences the way I choose to write. Sometimes it also influences the way I make solutions in-game, particularly the ones where I am forced to think outside of the box. I’m just out here trying to probe the corners of solution space to see what comes out.
Solving a puzzle, purely in theory
Solution space is almost always bigger than you can imagine. When selecting parts to include in a solution, the moment things go from “impossible” to “maybe possible”, you’ve probably found min cost. This means we should start with the most fundamental requirements, then slowly add more. Here are a few hard rules for well-behaved gameplay:
- You must place an arm in order to do anything.
- You must place every output.
- For every atom in every output, you must have a way to make that atom.
These rules are nothing surprising, but they do start the process. Let’s go back to Hair Product and place an arm, the output, and our input, satisfying all 3 bullet points:

The next thing to consider is bonds. In this case, every time we grab the input, it has no bonds on it, but the output has bonds in it. So to close that gap, we need a bonder.

Note: in some cases, you don’t need a bonder, (e.g. Alcohol Separation or Lamplight Gas), because the way to make outputs from inputs uses other glyphs instead. This is why I’m not including bonding in the fundamental 3 bullet points. We could replace it though, by:
- You must place enough glyphs to allow the inputs to become the outputs.
We aren’t yet worrying about reasonable locations for these parts. We’ve placed enough parts that a solution using those parts should be possible. They cost the same wherever you end up putting them. But also, we’ve pretty much placed everything from our earlier design anyway. Except for the 2 pieces of track. So, is track necessary?
Is track necessary?
Taken generally, this question is actually the deepest question in cost theory. If you have one of every mandatory glyph, then the rest of your cost comes from mechanisms: arms and track. A basic arm costs 20g and can be length 1, length 2, or length 3. Track costs 5g per segment.
With no track, a basic arm with any length has access to 6 tiles, marked here by glyphs of equilibrium.

When I say “access”, I mean that the gripper can start or end a simulation tick on that tile. These are the places where the arm can grab and drop.
Adding 2 track to each arm in the example, we increase the number of access points. It grows from 6 to 8 for the small arm, and to 12 on the longer two.

If we try to fit our earlier 40g Hair Product into this framework, we see that we used 4 access points for the length 2 arm on 2 track:

If all we needed was 4 access points, we can have that without track. Number isn’t everything though. We need to do a matching problem. On one side, we have the inputs and outputs and glyphs. On the other, we have the access points we enable with our mechanisms.
Because the bonder is two adjacent tiles, our length-2 and length-3 arms without track, can’t access both sides of it. Our length 1 arm can.

And so, placing input and output around the other access points (remember, only one tile of the output is needed), we can come up with a solution with no track, at the minimum cost.

Less trivial matching problem
Let’s take a look at Life-Sensing Potion. First we can just drag parts onto the screen.

We have 3 inputs, a bonder, a calcifier, an output, and the glyph of animismus. The animismus glyph is necessary, because the output contains vitae and mors atoms, created in a pair from two salts on the glyph of animismus. Salt comes from putting any element over the calcifier.
Of the three inputs, there is no reason to place more than one. So we can remove the other two, leaving us with 9 necessary access points:

This forces the use of track, just because 9 is more than 6. But how much track? How would we ensure that an arm can grab and drop on each tile of the glyph of animismus?
Channels
The most straightforward formalism to answer this and related questions, was developed by Shadowcluster. An OG community member most known for being a top area optimizer, he also laid the groundwork for a lot of cost theory. He called this concept “channels”.
Take an arm of any length, and imagine extending the lattice of its access points outward to infinity:

For the length 2 arm as pictured, this covers 1/4 of space. For a length 1 arm, it would cover all of space, while for a length 3 arm it would cover 1/9 of space. The general formula is 1/L² although there’s no reason to be general if we only have access to these 3 lengths.
This subset of the infinite plane, is one “channel”. If an arm base occupies a tile belonging to a channel, so too must its grabber. And vice-versa.
For the length 2 arm, we can divide space entirely into its 4 channels. I’ve elected to use calcifiers, equilibrium glyphs, single-hex track, and nothing, for the 4 labels.

The glyph of animismus, no matter how you place it, has one tile each in 4 separate channels. So when using a length-2 arm to handle that glyph, the arm gripper must occupy 4 separate channels. Thus so must the arm base, meaning 4 tiles of track. The track itself can take multiple different shapes, so long as one tile allows access to each channel.

All 4 of these track shapes and locations relative to the animismus glyph, show up in the min cost solution space of life sensing potion. Building a solution around them is left as an exercise to the reader.
At length 3, animismus also occupies 4 channels. At length 1, channels are irrelevant, but the arm is too short to reach across and so it takes 6 track to get to the other side, losing out.
Thus, for any puzzle using animismus, 4 track and one arm, is the lowest cost.
Channels with other glyphs
The other glyphs for which every tile needs access are purification (3 channels at either length), dispersion (4 channels at length 2, but 5 channels at length 3), and unification (3 channels at length 2, but 5 channels at length 3).
You will find that puzzles using these glyphs follow the same pattern as animismus. One glyph sets the required number of track. The track provides a lot of access points generally. Everything else becomes rather easy, if not a little tedious from the programming, due to ample access.
For an example, here’s a min cost solution to Volatility and Tranquility, a puzzle I built for the 2020 tournament. The glyph of unification occupies 3 channels at length 2, so the arm gets 3 track. The other neat idea in the puzzle is that the regular bonds in output can be preserved from the input, meaning you don’t need a regular bonder (just the triplex bonder that specifically acts on fire atoms, which is already necessary).

But the observant among you may notice, when looking at the access points for this arm, the triplex bonder is not on 3 access points. Its leftmost tile is not on an access point at all! So how does that work?
Partial access glyphs
The reason we needed access to each tile of animismus, unification, dispersion, or purification, was because those glyphs act on individual atoms. There is no way to use those glyphs with multi-atom structures. The contrapositive of that statement must also be true. That is: if you can use a glyph with multi-atom structures, you do not need access to every tile.
All types of bonding and debonding work with multi-atom structures But if all you have is single atoms to start with, then you need full access to a bonder to be able to get multi-atom structures in the first place. That’s why when we looked at Hair Product, it needed a full access bonder.
Calcification, duplication and projection all work with multi-atom structures as well. The case of projection is rather unique: the side of the glyph that consumes quicksilver, requires the atom of quicksilver on its own. The other side, where the metal sits, can be part of a multi-atom structure (though, new players will so often disregard this fact for Surrender Flare).
In fact, let’s look at Surrender Flare min cost to make sense of partial access glyphs.
Surrender Flare

A truly notorious level from the game, Surrender Flare requires you to project an iron atom to copper, but where the iron is surrounded by salt. The only way to use the glyph of projection, is to place metal and quicksilver on adjacent tiles, which means one of the salt has to move. This forces debonding before projection, and bonding after. As a result, you need all of the glyphs shown in the image, totaling 60g.
Now return to the deepest question of cost optimization: do you need track?
Well, if you assume full access on the 3 glyphs, plus access to the inputs and output, that would mean 9 access points, so the answer would be yes. But, this time we have multi-atom structures. We can manage partial access on these glyphs. Can we eschew 3 entire access points to get down to 6?
The answer is yes! And there’s actually multiple completely different methods to do so. The hardest way, is to use a length-1 arm with some structure-modifying wizardry we will come back to later. But the easiest way, which was found much earlier in the history of this community, actually uses a length 2 arm. So let’s talk about that.
Return of Channels
We want a solution to surrender flare that does the simple thing. Remove one salt. Move the rest of the flare onto the projection glyph. Use quicksilver to upgrade iron to copper. Move flare and salt onto bonder to connect them. Output. Repeat.
In order to have access to both the salt and the rest of the flare after debonding, you need to have a grab point on both parts. This is possible with length 2, because pairs of atoms opposite each other on the flare occupy the same channel. If you break off one of them, you can reach the other, like shown.

This length 2 arm will never grab the central atom directly, only salt and quicksilver. We can prove this; go back to the image of the extended lattice.
The only manipulations we can perform using this arm are rotations (centered on the arm base) and pivots (centered on the gripper). The center of rotation for either of these actions, is a lattice point. When rotating about a lattice point, lattice points map to other lattice points. There is no set of instructions that can send an atom from a lattice point to a non-lattice point, or vice versa. So when our input starts with the iron on a non-lattice point, that remains true throughout.
All of our glyphs that interact with metal then, which is half of our bonder, half of our debonder, and half of our projection, can only be useful if not on the lattice. There’s our 3 partial access glyphs.
What remains is to lay it all out and program it. Here’s a link to a solution, but I’ll give you the option not to view it in case you’d like to try it for yourself!
Space around the arm
If you tried to solve surrender flare at 60g just now, you maybe ran into issues with the arm getting surrounded. This is a very hard problem in cost, but it is worth figuring out when that problem is fundamental, versus when it is just an implementation detail. The key ideas in this section are input suppression, and the C.
Input Suppression
Inputs in Opus Magnum spawn whenever their glyph is fully uncovered at the end of a movement phase. With multiple arms, this allows for some funny business, where an atom moves onto the input the same cycle another leaves:

But in the world of cost, when there is only a single arm with a single gripper, this particular replacement is not possible. It can be done asynchronously though, if the input is multiple atoms.

This technique is known as input suppression. Input suppression in cost is used to allow atoms to move through input glyphs to the other side. In this particular health tonic solution, it’s completely unnecessary (do it without it if you want), but it demonstrates the idea.
Fundamentally, cost puzzles with multi-atom inputs are a completely different beast from cost puzzles with single-atom inputs. Partial access and input suppression both unlock a larger solution space. But when you have single-atom inputs, you aren’t completely stuck.
Woes of single atom inputs
Let’s look at the puzzle Golden Thread. In terms of fundamental necessary parts, theory says we could do it with an arm, a bonder, and the inputs, for 30g.

You’re building a polymer output, so a large molecule will always be there on the board, and never disappear like ordinary outputs when you output them. Thus you have 3 objects to worry about: the salt input, the gold input, and the polymer-in-progress.
Ordering these 3 objects properly around the arm, turns out to be a major challenge. It actually doesn’t matter where you place the pieces to begin with – eventually you will need a pair of objects to swap places. In the image below, I’ve made a complete ring, and I need to bond a salt to it. I could delay the inevitable by bonding a different salt first, but the specific salt I’m talking about can only go on the bonder from this direction (the inset shows the conflict if I try to bond it from the easier direction). So I would somehow need the salt, currently sandwiched between the gold and the partial product, to pass through one of them, and I don’t get to use suppression.

A thorough analysis of all the bonds can reveal that the problem is inherent to this pattern, and cannot be avoided.
The magic of the C
Golden Thread 30g is possible, and it doesn’t magically avoid this issue. It solves it!

How did that salt get there? Well, the output we are building contains a structure that can wrap around a single atom, enabling it to travel from one side to the other without collision. We call this the C. For Golden Thread, I used the following C:

This is a valid piece of the output, and additionally has the property that we need.
Each loop of the Golden Thread structure can be said to contain a C. Accordingly, we can pass one atom through the working partial product each loop, which is just enough to make it possible.
This process was discovered by Shadowcluster, 5 days into the game’s early access period. A few others, including Rolamni, independently found the process, but I believe they were already aware that someone had succeeded at 30g, which focuses the search. Rolamni did make the first ever looping 30g (by using conditional actions to handle the process of getting into steady state), and he shared it in the comments of this reddit post.
Since then, this has become a tool in the toolbox of the cost optimizer. Players make use of structures that fit other atoms or molecules inside. The C is the simplest, but the feature that matters is that one or more access points is surrounded by two or more access points on the same molecule, and the arm can pivot on either side without a collision.
Competitive Cost Optimization
In 2019, RP0 hosted the first ever Opus Magnum tournament, using custom puzzles he designed. The puzzle for week 2 was called Wire Forming and Unforming.

Back in 2019, Shadowcluster was a competitor in the tournaments (compare to today, when he instead helps playtest and provide advice to the host, abstaining from competition). So he is once again a central figure in the history.
Each puzzle allowed submissions for two metrics, and Shadowcluster had swept week 1 with dual wins in cost and area. He seemed poised to repeat the feat in week 2. On my end, I chose to submit to cycles and cost. My layout looked like this (image and captions from this imgur album):

70g used two track hexes, with a length 2 arm to provide all 9 of the important access points. To do 60g would require partial access for 3 different glyphs: projection, bonding, and debonding.
When talking about this puzzle, Shadowcluster coined an infamous term: “dubious cost”.
Dubious Cost
Looking at a puzzle, sometimes it is very straightforward to prove the minimum cost. You can bound it below by the theoretical sum of all needed parts. You can bound it above by designing a solution, or at the very least convincing yourself of a process. If your two bounds agree, you know the minimum cost. If your bounds do not agree, you have dubious cost.
So for Wire Forming and Unforming, most everyone could agree that 60g was the theory minimum, but we only understood implementations for 70g. This made 60g dubious.
The community is not entirely in agreement on what qualifies as dubious, long-term. To some, it’s purely a matter of access point counting. If you have to sacrifice access to hit theory min, then theory min is dubious.
For others, it’s all about the gap between the two bounds, and as soon as one person makes a solution at 60g, it is now trivial to upper bound the cost at 60g. You just point to that solution. Additionally, some players are far more confident in their ability to conceive of a process, and before a solution has been made will declare a puzzle “not dubious” in defiance of others who still can’t wrap their head around a working method.
I wanted to define the term in this blog post, but it really is a hard one to nail down, because it is subjective as to whether it is subjective. Suffice to say, if a cost problem is meaningfully non-trivial, someone may end up using the word “dubious” to describe it.
The winning solve
Shadowcluster submitted the above for Wire Forming and Unforming, the only person to complete 60g within the allotted time for submissions. In the description he writes: “Proof of dubious cost. There are several improvements here if you are willing to slog through, but this I don’t really have any motivation to improve.”
This solution has access to one tile each of projection, bonder, and debonder. Its other 3 access points are on the two inputs and the ordinary output. For the polymer outputs, it abuses the polymer detection, placing molecules onto the output that are only correct where it matters. It heavily uses multi-atom input suppression. It also enjoys the ability to use both bonder and debonder, to achieve nearly unlimited large molecule manipulation. The community learned a lot from the above video.
It also served to validate hosts in creating unique cost puzzles, inviting players to pioneer interesting methods.
High Gloss Finish
I feel a little bad skipping over RP0’s final puzzle Wheel Inversion, as the challenge for cost there was truly unique, but it was a computation puzzle outside the scope of this blog post. So we move on to the 2020 tournament, when I was the host. I gave a taste of dubious cost in week 1 with Potent Potables, which wanted 7 access points but could be done at min cost by sacrificing access to one end of either bonder or debonder. But by the penultimate week, I took the gloves off and provided a brutal puzzle, targeting cost and cycles. The puzzle was High Gloss Finish.

The output has gold, air, and water atoms. Because the input contains only salt, air and water atoms can only exist by placing the Van Berlo’s Wheel (arm 1) along with a glyph of duplication. The metal has multiple options. You can place the glyph of purification, allowing upgrade from lead to gold using only other atoms of metal from the large input. Or you can place the glyph of projection, forcing you to place both inputs. Either way, there was going to be waste. Fortunately I gave access to the glyph of disposal, which is free. Unfortunately, it uses an access point.
In order to cost optimize this puzzle, the options were forced. You needed to place both inputs. Quicksilver was your metal upgrade, no purification allowed. You needed to handle the waste directly without disposal. And wouldn’t you know it, this left the same access problem as Wire Forming and Unforming, but with a bigger input and output, and now with a Van Berlo Wheel so you had to prevent your waste from crashing.
Fake cost
I wanted to have mercy on the competitors who didn’t feel up for this sort of a challenge, and not make them program some really long cost solution just to be at min+10 and feel bad. So, I designed a special scoring system. The nominal metrics for this puzzle were cycles and sum (cost + cycles + area). But if you were able to make a solution with the minimum possible mechanism cost, it would replace your sum score by a guaranteed win.
Mechanism cost only counted the arm, track, and Van Berlo Wheel. You could place extra glyphs as much as you wanted, though with a basic arm and no track you would not have any direct access to them.
I wrote some of my thought process on the puzzle here for those who are curious.
PentaPig
In 2020, PentaPig was the unstoppable force. Entering week 7 with a massive lead, he put it out of reach by winning the cycles and fake-cost metrics. His fake-cost layout looked like this:

Interestingly, he used two access points on the small input! Because I allowed more than one bonder and debonder, he took that opportunity and found ways to use them well with no access at all. I was excited to see this, as no-access glyphs were still pretty novel. A better view of his solution is available in my analysis video from the tournament.
In the time since, a player known as rebix or reb has come through and made a true min cost solution. I think in the lineage of cost wizards, reb and kaliuresis are the current strongest players, but both arrived later than 2020 when PentaPig reigned supreme.
After completing High Gloss Finish, PentaPig ranked it as less difficult than Wire Forming and Unforming. To PentaPig, only one completed min was harder than Wire Forming and Unforming: Sailcloth Thread.
Sailcloth Thread
Taking a brief break from tournament cost puzzles, I would like to give some attention to PentaPig’s incredible run through campaign and journal cost puzzles. In addition to Refined Bronze, which I pointed out in the previous post, PentaPig described as “dubious” all of the following:
- Electrum Separation
- Wakefulness Potion
- Parade-Rocket Fuel
- Sailcloth Thread
- Celestial Thread
He completed everything except for Celestial Thread. The two threads are particularly difficult due to requiring a single-atom input. That did not stop him on sailcloth thread, though.
Building on an idea by the Chinese player jinyou, he used a C to suppress the large input while straddling the single atom input, so that either of the inputs could be pulled in the same direction. Then he maintained an intermediate blob of atoms to transfer parts to the final assembly. Each step of this was a unique process he solved as he went.
To my eye, the steps look very non-obvious, but eventually it makes clear and real progress.
To this day, one other player known as “chompyzilla” has worked on sailcloth thread 40g, and built a design very similar to PentaPig’s:
It is an unsolved problem whether looping 40g can be done – reb has made looping versions of many of the challenging cost solutions (including Refined Bronze) but not this one.
Edit after posting: within half a day of this blog post going live reb made a looping sailcloth thread 40g. Here it is. It’s also significantly faster than the two solutions above.
Lustrous Syrup
Back into the world of custom puzzles, there have been several other competitive cost puzzles with interesting results. These include Mist of Dousing, Lubricating Solvents, and Arquerite Promotion. However, I am going to pick Lustrous Syrup to talk about next. This is because, despite valid claims of misattribution, one extremely useful idea for dubious cost is now forever dubbed “syrup tech”.
What is the tech, and why is it so important?
Recall the statement from earlier about debonding surrender flare: “In order to have access to both parts of a molecule after debonding, you need a grab point on each.” This is not strictly true. The exception is when the molecule that is out of reach, sits atop a bonder. As long as you can reach the other side of the bonder, you can regain access to the otherwise-stranded molecule.

This isn’t new, necessarily. A clever custom puzzle by Jenny from all the way back in 2017, uses this principle. In Dexterity Toy, you can’t grab the central atoms after debonding them from the cage, so your only option for manipulating them is to form a new bond to the other side.
The idea also showed up in a solution by Peanlocket for the 2020 puzzle Potent Potables, optimized for sum (not cost). One small piece breaks off in the top right, but is recovered by forming a bond immediately after:

This idea had even appeared in dubious cost before: reb’s High Gloss Finish. But that was too complicated a puzzle, and probably the community had not studied its movements.
No, what Lustrous Syrup provided was a common reference point for the tech. A dozen people struggled through dubious cost, and the best few solutions made it look incredibly easy.
Benefits of Syrup Tech
When you have both bonder and debonder among the required glyphs, you can do a lot of structure manipulation. Xavion called it out during the early days of Refined Bronze, and we saw some of its power there and in Wire Forming and Unforming. In syrup tech, your bonder goes right next to the debonder. This way, you have many different opportunities to break apart molecules such that a part of them ends up over the bonder. This causes certain shape families to convert extremely nicely into each other.
In Lustrous Syrup, many players struggled to reshape the two-atom inputs into the four-atom Y shape output using only a half-access bonder. You can’t prepare the final bond without somehow placing a part outside of reach of the arm. But in this clip, syrup tech makes it look like the simplest thing in the world.
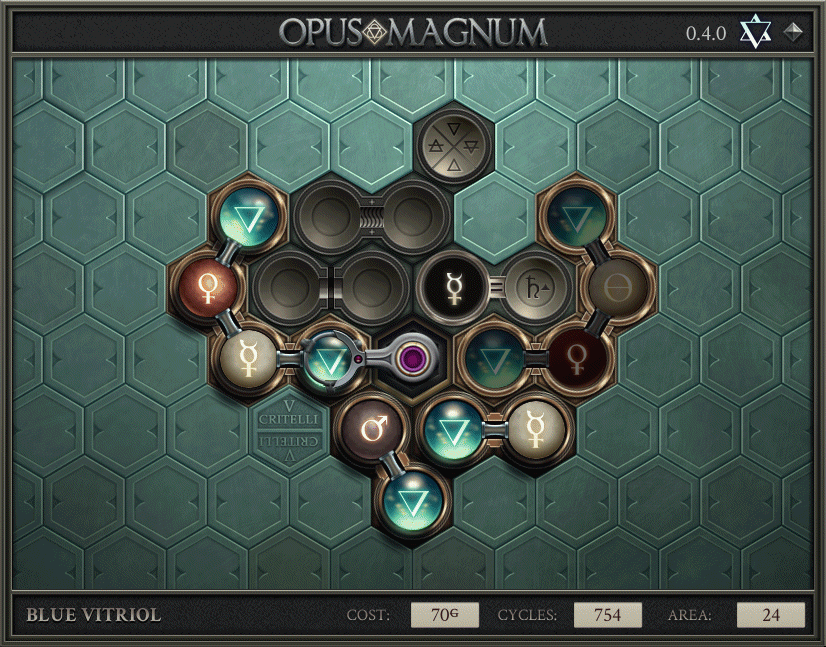
In later cost puzzles Hydroponic Solution or Blue Vitriol, players ran into similar shape issues. A compact version of a molecule could convert into a desired version (usually with more 120-degree bonds) by utilizing syrup tech.
Leaving atoms outside of access of your arm can also provide a third solution to moving pieces past each other. This only works if the bonder is no-access, but that does come up often these days..
To me, the key benefit of syrup tech, is the idea that stranding a molecule is recoverable. So, when I may previously think an idea is a dead end, there’s one further avenue to keep it alive. But that’s because I usually think in terms of other metrics, like Trackless Instructions where adding bonders is not a problem. Two distinct beautiful recoveries of stranded molecules in trackless instructions can be found in this solution by Kazyan:

Cutting Edge
So what does it take to make the current top players sweat? Noteworthy recent wrinkles in the cost scene come from Celestial Thread (November 2022), Warp Fuel (March 2023), and Latch-hook Fireworks (just last week, March 2024). Let’s start with Hallojasper’s triumph over the final dubious thread, and to date, last known primary cost improvement in Opus Magnum.
Celestial Thread
Do you want to watch a 46 minute movie consisting of 15 thousand cycles?
Several players, including reb and PentaPig, attempted Celestial Thread and put it back down, unable to reach 70g. The single-atom tin input provided an ordering headache, and making a C shape to pass it through the layout was unwieldy. Hallojasper was able to find 70g without a C. The tin never needs to swap positions with the output, as long as you are willing to build a much, much much larger molecule than necessary. Any extra tin, taken as part of enabling some other manipulation, gets stuck onto the end. It does a lot of “stickwalking”, where the arm slowly pans from one side of a large molecule to the other, which is the cause of the enormous cycle count.
This was only possible thanks to external tools to create a solution file without the limitations of the game. In particular, Hallojasper credits omclone, a tool built by community member notgreat with greatly improved editing features for solutions with a small number of parts and a large number of instructions (cost and area optimized solutions, primarily).
With time to study this solution, reb took another crack at it in 2023, and was able to make a looping solution. This one uses the C shape, meaning it avoids a lot of stickwalking and comes out simpler and faster. In this form, jinyou and reb worked together to cut the cycle count down to less than half the original:
Warp Fuel
Back in the competitive tournament environment, 2023 upped the ante for dubious cost. The host, panic, designed a puzzle with the familiar bonder + debonder + projector half access trio, with two inputs and an output. He called it Warp Fuel. Like High Gloss Finish, it needed Van Berlo’s Wheel and duplication, and had forced waste. In addition, the player had to create yellow-only triplex bonds, and one of the inputs was a single fire atom. This combined so many different aspects of dubious cost, without anything making it impossible. And panic didn’t give us a weakened version of the metric like I had in 2020. No, we were asked to take on raw cost. We had a week to try it out.

Two people managed to make minimum cost solutions: kaliuresis and reb. PentaPig took third place with a very optimized min+10 (two tracks). PentaPig had voiced doubt that anyone would get the minimum cost. For two people to do it, with kaliuresis also creating the 2nd place cycles solution in the same week, speaks to how much the player base has advanced.
You can read more about their solutions in the 2023 tournament blog post. kaliuresis used syrup but not Cs, and had to handle each product differently due to waste. reb, meanwhile, had discovered a looping method using syrup and Cs. Both were massive feats of engineering with cycle counts in the 6000s.
Clearly the players had become skilled at finding these corners of solution space. Additionally though, the puzzle designers had become skilled at creating puzzles with these corners to find. That brings us to 2024.
Latch-hook Fireworks
Zorflax was the puzzle designer or co-designer of several weekly puzzles, including Lustrous Syrup (with Haxton as other co-designer). In 2024, we finally had a Zorflax tournament, full of puzzles he had been saving for years. For week 5, he revealed the puzzle Latch-hook Fireworks, a new frontier of dubious cost.

Depending on your familiarity with the cost landscape, this image may bring unease for several different reasons. First, there are the four outputs, each consisting of various types of triplex bond. No ordinary bonds are needed, so you don’t get to place a regular bonder (reminiscent of Volatility and Tranquility from before, or another competitive puzzle Improved Explosive Phial).
Then are the two inputs. Between them are all 4 types of element, so there is no need to place the expensive Van Berlo’s Wheel. To get triplex bonds with non-fire atoms, you would need to first convert atoms to fire, form the bond, convert to salt, and then convert that salt to the desired atom type. All of this could be done with duplication off of other atoms, so long as all 4 atom types are present somewhere.
Finally, there is the question of access. And this is the funny one. We’ve reasoned that both inputs are necessary. With 4 outputs and 2 inputs, you already have used up 6 access points. If you want to touch any glyphs at all, you need track. But since everything has multiple atoms, you don’t need to touch glyphs..
Reactions
Several people sent their thoughts to Zorflax. mr_puzzel weighed in with a meme:

I was also intimidated, but wanted to give it a go:

reb, however, took it in stride and built a solution in just over ONE HOUR.

We each have a different glimpse into solution space, shaped by our own understanding of what is easy and what is hard. Zero-access glyphs require different handling than glyphs with full or partial access, but some players can see an entire working process regardless. It felt to me like anyone who got 80g for this puzzle had triumphed over the new hardest cost challenge. But as the week went on, I actually found a way to do it, and began to doubt I was alone.
Results
Nine people. That’s how many of us independently created solutions at 80g. The list of legends, from 9th to 1st in the ranking:
- “who” (a.k.a. albatross)
- me
- SmallCrepe
- Kazyan
- ebonnov
- rebix
- fiesta0618
- CooCoo52
- kaliuresis
We took several different methods. “who” had an enormous extended C that was large enough to pass two atoms through. This took the highest cycle count at over 12 thousand. They joked that they could add a single useless piece of track somewhere in the solution, making it 85g instead, and it would not affect their placement.
I built a waste chain that reached the glyphs I needed and could break outputs off from. This had the highest area count at over 20 thousand.
Then we got to the “simpler” looking solutions of SmallCrepe through CooCoo52. These all built small structures that could reach out to the no-access glyphs, but didn’t extend further than necessary. I would recommend looking through that segment of the results video. If nothing else, Kazyan’s notes that Zorflax reads out on stream, are a treat (timestamped here).
Then in first place, we got a little crazy once again. kaliuresis built a solution titled “We have berlo at home” that managed to complete the puzzle in under 2 thousand cycles, the fastest by far at min cost. He used omclone for the actual programming.
How I thought about the puzzle
Let’s prove some things about 80g latch-hook fireworks. First, let’s prove the arm must be length 1.
By the channels argument from before, we can see that for length 2 or length 3, the triplex bonder gets to have either 0 or 1 tile occupying the channel with the arm. There’s no way to place it on two separate lattice points.
Accordingly, any atom the arm is holding, can have at most two triplex bonds on it. There will be some bond that requires both atoms participating to be on a different channel. But that means there’s an output you can never hold. Even if you could make it, you could never drop it onto the output glyph.
This leaves only length 1, for which every tile is on the same channel.
Not all no-access glyphs are created equal
With a length 1 arm holding a 2-atom input, you can put an atom on each tile of a radius 2 hexagon. That gives 18 tiles to place glyphs. But 12 of those tiles are taken by inputs and outputs, and there are 8 tiles of glyphs needed. This means two tiles of glyphs need to be even further away, outside of the hexagon. Just based on its size, one of those tiles needs to be triplex, but the other can be chosen by the solver.
Enjoy my shoddy compilation of the 9 different layouts the submitters at 80g used:

We saw either side of duplicator, debonder, and calcifier each take the spot outside the hexagon. Basically, solution space did not constrain you further on which glyphs you put where. You just needed “enough stuff close enough.” In who’s case, lower right, there was actually an unused space inside the hexagon, and both duplicator and debonder sat further away!
The winning layout, kaliuresis in top left, placed outside the hexagon the half of the duplicator responsible for holding elements to duplicate. This was because of his process of creating large chunky objects that suppressed inputs while placing an element on that distant duplicator to serve as “berlo at home”. This was actually very similar to who’s approach, but bypassing a lot of intermediate structure that led to kaliuresis having a simpler and more direct process.
To see kaliuresis’s design in action, watch the results video from this timestamp.
What’s Left?
It is possible to design challenging cost puzzles all day, but the main question most players have is whether there are any remaining saves within the released set of puzzles. For some puzzles like Very Dark Thread and Voltaic Coil, we’ve successfully proven the need for track. There is exactly one remaining “dubious cost” left unfinished: Fragrant Powders.
This puzzle takes place in the confined space of a production chamber. I previously described this type of puzzle in the instructions post.

There are two different types of solutions known at 60g: small arm in each chamber, and piston in large chamber. Both types have a build-up of salt waste, because min cost does not get to place a duplication glyph. Waste in production is a specific kind of nightmare.
To get lower cost, you would need a solution that resembles the large chamber piston, but uses a less expensive mechanism. Fixed arm no track has been proven impossible. A fixed arm on two track leaves just enough space to place the rest of the required glyphs, inputs and outputs in the chamber. You will not have full access. Good luck handling the salt waste.
Trackless cost
I would like to draw attention to one other “dubious cost” idea. The community leaderboards care about far more measurements than just the 3 in-game metrics. One of those is a simple yes/no for whether the solution contains any track. So, separate from cost, there is the idea of “trackless cost”. Hallojasper is one of the best and most practiced with this metric, and as an example of a solution, here is Ablative Crystal from the journal (from this reddit post).
Rather than 3 track to handle purification, this solution uses two arms, costing 5g more but being the cheapest possible trackless solution. So are there puzzles where we don’t have theory min trackless cost?
Yes. The puzzle Stamina Potion has a trackless cost record of 70g, using two arms.

50g is provably impossible, so the ordinary cost record is 60g with two track. In theory, trackless cost would also be possible in 60g, using one regular arm, and adding a no-access debonder. Some sort of C can help get around the single-atom inputs, and the debonder would allow you to recover the proper output shape afterward. Trackless 60g stamina potion is another route for those wanting to chase an open question in the world of dubious cost.
Frontiers in design
Some solvers have remarked that we have yet to see a puzzle where trackless length 2 is dubious but trackless length 1 is impossible. I attempted to make one in the past with the aptly-named “Channeling Crystal”, but the complete version turns out to be impossible with length 2, and the incomplete version is not hard enough to be dubious.
Surrender flare may have once been seen as a candidate for this type of challenge, but then PentaPig made a 1 arm solution, and for completeness, reb went ahead and made a length 3 arm solution as well.

As a different avenue for challenging cost, we could explore situations that require the use of glyphs in unusual ways. It’s rare that a glyph isn’t necessary but still ends up better than not placing it at all. But it isn’t unheard of in area, so maybe it shows up in cost too!
I’ve been continually impressed just how much depth this community squeezes out of the cost metric! Hopefully the game and its devoted players continue to deliver. Thanks for reading!